Wednesday, March 26, 2014

Wholesome Banana Blueberry Muffins


Remember all those blueberries we froze last August?  For ideal taste and texture, frozen fruit should be used up in about 6 months; if you haven't done so already.  I was rooting around in the freezer the other day and discovered that I still have a bag containing about 4 cups worth!  Better get at it!!

I usually lean more towards making mini-sized muffins, as they are easier for the kids to gobble up.  Mini's make a great addition to their lunch boxes as a snack, rather than those ginormous meal-sized jumbo muffins.  Also, by making them mini rather than jumbo, even if the muffins turn out not to be a fave, it's not that big a deal.  My logic is:  I'd rather the picky eaters to have taken one bite out of a mini, then the waste of one tiny bite out of a jumbo!  I only have a couple mini tins though, so I fill them with the batter first, and then move on to the larger sized muffin tins with whatever batter remains.  Daddy sized muffins are also neccessary, I suppose (wink wink)!

I didn't have to worry about waste with these Banana Blueberry Muffins though; they were a hit!  Super moist, and full of flavour and blueberries, they were gobbled up completely.  Hurray!

Wholesome Banana Blueberry Muffins

1/2 cup whole wheat flour
2 cups spelt flour
2 cups sugar
3 bananas, mashed
1/4 cup of coconut oil, melted
1/2 cup applesauce, room temperature
4 eggs, room temperature
1 teaspoon baking soda
1/2 teaspoon salt
1 Tablespoon flax meal (optional)
1 Tablespoon of lemon zest
1 teaspoon cinnamon 
2 cups of frozen blueberries   

Preheat oven to 350F.  Add muffin cups, or grease muffin tins, and set aside.
Using a medium sized bowl, sift together flour, baking soda, salt, cinnamon, and set aside.
In a separate bowl, cream sugar and mashed banana together. Mix in oil, and lemon zest, then add the eggs one at a time, stirring after each addition.
Next add the flour mixture, and stir until just incorporated, try not to over mix.  Finally, carefully fold in the frozen blueberries.
Drop batter into prepared muffin tins, and bake for about 25-30 minutes. Or until a tooth pick is inserted in the center and it comes out clean.
Allow to cool about 10-15 minutes, before serving, or store in an airtight container and add to lunchboxes throughout the week.

Enjoy!

Sunday, March 23, 2014

Sunday Funday - Remixed Crayons!


Well that was a nice glimpse of spring, wasn't it?!  Now we're back to the depths of 
winter!  We're getting a little cabin feverish, and stir crazy.  
A fun and creative activity that we recently discovered was in re-purposing all those little crayon stubs we have accumulated.  


Preheat the oven to 250 degrees while the kids take the paper off the crayons and then break them into tiny pieces.  This can take a little while! My 5 year old used his hands, but my 11 year old decided using a knife was easier, and she's old enough to do so, other wise make it the parent part.  Fill the tins or oven safe molds with crayon pieces, arranging them in interesting designs and colour combinations.


Bake until the crayons have just melted,  about 10 to 15 minutes.  I found ours looked really watery when they were melted, and once they cooled, they had a clear wax layer over the top, but that didn't affect the integrity of the design, and the kids still totally dug them.


Remove the shapes from the tins after they have cooled. If they stick, place tray outside or in the freezer for an hour, and the crayons should pop out.  These remixed crayons change colours as the kids create their masterpieces, and would even make a fantastic and unique home made gift!


Have Fun!


Wednesday, March 19, 2014

Berry Blue Cheese Salad with Maple Balsamic Dressing!


As much as I LOVE sweets, and baking them and eating them.  That indulgence is usually reserved for the weekends.  During the week I'm trying my best to stick to healthy eating.  It's also very important for the Warfarin drug therapy that I'm on to maintain a consistent level of greens intake, as the my levels can drastically fluctuate if I change my diet.  During Christmas vacation was a perfect example, as my INR rate went as super high - 3.1!.  Usually my issue is that it is stuck really low, but that is because the amount of vitamin K in the form of leafy greens (kale, spinach, parsley, green tea) I consume on a daily basis.  I had taken time off to stay with the kids while they didn't have school, and without my routine of work, and healthy eating, the sweets got the better of me.  
I'm back on track now, but I have to remember how potentially dangerous this could be!  My prescription is based on my specific drug needs.  So not eating properly, not only affects my diet and weight-loss goals, but has life threatening consequences.  The trick is finding the salads that keep me on track, and keep my palate from getting bored.  
What I love about this salad is that the delicious Maple Balsamic dressing, paired with fresh and/or dried berries, even curbs my cravings for sweets; so hopefully I don't reach for a(nother) treat!

Berry Blue Cheese Salad
I usually just make this as a single serving salad, measurements are approximate and easy to double or play with according to personal taste.

2-3 cups mixed spring greens
1/4 cup or handful blackberries
2-3 strawberries, hulled and sliced or chopped
1-2 Tablespoons Blue cheese, crumbled ( I used Bleu D'Auvergne from Janice Beaton - Yum!)
1/8 cup  or small handful raw walnuts
1/8 cup or small handful dried berry mix (blueberries, cranberries, cherries), Optional

Using a small salad bowl, add pre-washed mixed greens, and a handful of blackberries (or blueberries!), chopped strawberries, followed by blue cheese, walnuts, and dried berries, topped with a Tablespoon or two of the Maple Balsamic Dressing!

Maple Balsamic Dressing
This dressing is a perfect compliment to the greens and sweet berries in this salad, if you don't have the time, and happen to be a Superstore or No Frills shopper, try President's Choice Maple Balsamic Vinaigrette.  It's a great alternative to my homemade dressing.

1 tbsp whole-grain Dijon mustard
1/4 cup Balsamic vinegar
3/4 cup extra virgin olive oil
2 Tablespoons maple syrup
sea salt & freshly ground black pepper to taste

Add all ingredients into a jar, or container (make sure it seals well) and shake! Voila!

Friday, March 14, 2014

Happy Pi Day! (Mini Apple Pie's)


Another recipe that falls on a Friday, that is not popcorn??  What is becoming of me?!  
I still haven't managed to replace my beloved popcorn maker, plus, today has a special date: 3.14 = Pi Day!!  Obviously, the normal thing to do on such an occasion...bake up these cutie patoutie mini apple pi(e)s to celebrate with!

Pi Day is an annual celebration of the mathematical constant π, which observed by foodies, and smarties alike on
March 14, or 3.14!

Wait until next year, all the math lovers will be swooning, 3.14 15!!


Mini Apple Pies

Pie Pastry
1 1/2 cups all-purpose flour
2 Tablespoons sugar
1/2 teaspoon salt
3/4 cups unsalted butter, very cold, cubed
1/8 cup all-vegetable shortening, very cold, cut into small pieces
3 - 4 Tablespoons ice water

Apple Filling
3 apples, cored and diced
2 Tablespoons butter
1/2 cup brown sugar
1 teaspoon cinnamon
1/4 teaspoon nutmeg
1/4 teaspoon cloves
1 Tablespoon corn starch (optional - if you find it too juicy/runny)

On Top
1/8 cup milk or heavy cream, to brush over the top
 2-4 Tablespoons sugar, for dusting

Using a food processor or good ol' fashioned hand held pastry cutter, mix or pulse together the flour, sugar and salt until well combined.  Next add the butter and shortening to the flour mixture and blend or pulse until the butter and shortening pieces are pretty much pea-sized.   Add the ice water, a tablespoon at a time, continue to blend or pulse to combine, until the dough is evenly moistened. Pinch a bit of dough together between two fingers to test...the dough should stick together.  If the dough seems dry, add a few more teaspoons of water and mix again.
Gather dough into a ball, and wrap tightly in plastic wrap.  Refrigerate for at least an hour before you begin to roll out the dough.
While your dough is chillin' make your apple pie fillin'!
Using a medium sized pan, over medium-high heat.  Add the diced apples, butter, brown sugar and spices to the pan and stir to combine. Cook until the butter is melted and the apples are just softened (not mushy!), about 2 minutes.  Remove from the heat, and set aside and allow to cool to about room temperature.
Rolling, cutting, baking!
Preheat the oven to 350F.   Grease large sized muffin tins, or line with parchment, and set aside.
Remove dough from the refrigerator. To save on clean up, I use two sheets of parchment paper, the dough placed in between the two, to roll.  As the dough warms, it gets sticky, so work fast, or add flour to the parchment prior to rolling.  Roll out to about 1/8 inch thickness.  Using a 5 inch diameter cookie cutter, or drinking glass rim, to cut out: 6 circles for bottom, & 6 for top, 12 total. Gather dough, and re-roll as necessary to achieve all 12.  If you want to get fancy, create your design in the 6 pie tops, or simply slit with a knife, or pierce with a fork.
Gently push the dough circle into the pre-greased muffin tin, and then fill with cooled apple filling.  Place on pre-designed top dough circle over the apple filling, and press down gently.
Lightly brush the top of each pastry with the milk, and then sprinkle with the sugar.
Bake for 30-35 minutes, until the pies are golden brown and cooked through. Let cool for 10 minutes or so, before carefully removing from tin.  Serve warm with a scoop of ice cream, or dollop of whip cream.  Or allow to cool completely, and add to a lunch box for a special Pi Day surprise!

Enjoy!

Wednesday, March 12, 2014

Honey Spiced Blood Orange Cake (Low Gluten, Low Carb)


Wanna know a secret?  I had never even tried a blood orange until now!  I don't even have a good excuse as to why?  I'd most likely chalk it up to cost.  Although, from what I read on the interwebs, they are only in season from January to April, and not necessarily stocked in all grocery stores.  Which is probably why I never tried them as a child, coming from a small town and all.  That, and we basically had a wee orchard, full of apple, pear, & plum trees, and grape vines, and a garden full of other fruits and vegetables.  We primarily managed to eat off our own land. So lucky!  I managed to score this bag of blood oranges 50% off, which if you know me: a good deal is my kryptonite, cannot resisit! 


Blood oranges are an absolutely beautiful fruit to admire, with a deep red flesh and a blushed rind.  If compared to a normal navel orange, the flavour and aroma are somewhat stronger.  They have a tart, sweet flavour, similar to a raspberry.  Also, the pigments of the blood orange happen to contain greater amounts of antioxidants than other oranges.  Bonus!


I was so inspired, by this jewelled fruit, that I dreamt up a recipe that would really showcase it's beauty.  I hope that you enjoy this recipe as much as I did!  It's full of the bright citrus flavour of the blood orange and paired with some earthy spices.  Nutrition wise, it's low in carbs and gluten content, has healthy fats, while still being light, and just lovely. 


Honey Spiced Blood Orange Cake 
Recipe Adapted From: Paleo Sweets Treats Cookbook

1 cup almond flour
3/4 cup light spelt flour
1 teaspoon  ground cinnamon
1 teaspoon baking powder
1/4 teaspoon baking soda
1/2  teaspoon ground ginger
1/4 teaspoon ground nutmeg
1/4 teaspoon salt
1/2 cup coconut oil, melted
3 eggs, room temperature
1 teaspoon vanilla
1/4 cup freshly squeezed blood orange juice
1/2 cup raw honey
Zest of 1 blood orange

Blood Orange & Honey syrup
1-2 blood oranges, use the zested one or peel one so the bitter pith is removed, then slice thinly
freshly squeezed blood orange juice
2 Tablespoons raw honey

Preheat the oven to 350°F  Grease loaf or cake pan with coconut oil.
Take the thinly sliced orange rounds, and line the greased pan.  In a small bowl, combine the orange juice and honey and stir until the honey is dissolved.  Pour the juice over the oranges, and place in the oven as it preheats, and you prepare the cake.  Allow about 15-20 minutes (turn halfway) of baking time,  so the oranges can soften and candy slightly.   
While the bottom/top is candying, make the cake!  
Using a medium bowl, add together the almond and spelt flour, baking soda, baking powder, cinnamon, ginger, nutmeg, salt, and set aside.
In a large bowl whisk together the the coconut oil, eggs, orange juice, honey, vanilla, and orange zest.  Add the dry ingredients to the wet and mix until well combined.
Carefully pour the batter over top of the candied oranges, spreading evenly.  Bake for 30-35 minutes, or until lightly golden and a toothpick inserted into the centre comes out clean.
Let the cake cool in the pan for about 10 minutes, before inverting onto a plate to reveal the beautiful bottom of candied blood oranges, and allow to cool completely, before slicing and serving.

Enjoy!

Friday, March 7, 2014

White Chicken Chili


Yes, today is Friday.  Didn't mean to mess you up by not posting a popcorn recipe today.  Unfortunately, I have some sad news.  Brace yourselves. 
My beloved air popping popcorn maker is no longer with us.  *Sobs*  It went out with a bang, or more like a massive fit of sparks, and scared the bejesus out of me!  I jumped back, screamed out loud (!), and then was so, so sad.
That popcorn maker gave me a lot of great years, and numerous Friday night feasts.  This post is dedicated in it's memory.  

A popcorn recipe of some sort probably would have been a more fitting farewell, but I didn't have any on the back burner.  Also, I promised I would share the recipe for this White Chicken Chili in a timely matter!
Remember the day before last, I shared with you that fab Chipotle Lime Roasted Chicken?  Hopefully you did as instructed, and hung onto that carcass, and have since been simmering those bones (along with the garlic, cilantro and lime stuffing), to be the stock for this chili! 
If you haven't, fear not.  You could easily just swap in boxed broth or a bouillon cube or two. 
But if you're looking for the bees knees White Chicken Chili I've got here, I'm sorry, but it just won't be the same *wink*!
This White Chicken Chili has an amazing depth of flavour, and I swear it only gets more tasty if left for the next day.  Yes, turning leftovers, into more leftovers. Crazytown.

White Chicken Chili
Recipe Adapted From: The Kitchn
3 tablespoons olive oil
1 onion, diced 

2 stalks celery, diced
1 green bell pepper, diced 
1 jalapeno pepper, seeded and minced
1 small can (4oz) fire-roasted green chiles

4 cloves garlic, minced
1 teaspoon ground cumin
1/2 teaspoon ground chili powder
1/4 teaspoon cayenne, or more if you like heat
approx 6 cups chicken stock from Chipotle Lime Chicken leftovers
2  cans white beans, Navy, White kidney beans, or something simular
2 cups fresh or frozen yellow corn
4 cups cooked, shredded leftover chicken, or rotisserie

1 1/2 teaspoons Tabasco sauce
6 Tablespoons butter
6 Tablespoons all-purpose flour
3/4 cup milk or cream
salt and pepper, to taste
Sour cream and grated cheddar, for serving


Place a colander over a large bowl or another soup pot (sorry, extra dishes!), and then pour the bones & stock you've been simmering into it.  Set aside to cool, so you can pick out any extra meat, before discarding bones, garlic, and limes (hang onto broth, and any meat!) 
Over medium heat, add olive oil in the soup pot you were already using for stock (no need to wash).
Add the onion, celery, bell pepper, and jalapeno and cook until onions are translucent, about 10 minutes. Add the can of green chiles, garlic, cumin, chili powder, and cayenne; saute for an additional minute or two.
Pour in the reserved chicken stock and bring to a boil.  Add the beans, corn, leftover chicken, Tabasco, and a generous amount of salt and pepper.  Reduce the heat to low and simmer for about an hour.
Melt the butter in a heavy sauce pan over medium heat. Whisk in the flour and cook the roux for 1-2 minutes. Pour in the milk and continue whisking until a thick paste forms. 
Add the roux to the stock & veg, stirring so there are no lumps, and continue to cook, for about another hour.  Taste, and adjust seasoning if necessary, adding more salt & pepper if needed.
Serve chili with sour cream, grated cheese, cilantro, & freshly baked cornbread.


Enjoy!

Wednesday, March 5, 2014

Chipotle Lime Roast Chicken


I don't know what it is about a roast chicken, but for some reason, I very rarely veer from the traditional butter & herbs.  There was that delicious Jamie Oliver Chicken in Milk dish that I once ventured...Oh, the picture of it is horrible looking back!  But, it was super yum - believe!  Mostly though, I'm stuck in a roast chicken rut.   The same recipe, the same way, every time.   Even the same recipes tend to get on a weekly rotation, relate-able?  I'm lucky though, as I work in the library, with inspiration just a book shelf away,  and usually a massive pile of cookbooks end up at my bedside. My main problem is time management, or maybe not the management of it, but lack of it all together! Roast up this chicken on a lazy Sunday, and reap the benefits with at least two more meals!  A time saving meal solution - hooray!
I can't remember where I found this recipe, but I can not recommend it highly enough.  Full, full, FULL of citrus infused flavour and a hint of chipotle spice.  It's worth the effort of roasting for the leftovers alone...which I turned into an amazing white chicken chili!  The recipe for which, will be posted in a timely matter.  
Forewarning: hang onto that carcass! (sound lovely, doesn't it?) 


Chipotle Lime Roast Chicken

1 3-4 lb. whole chicken
2 Tablespoons butter
2 cloves garlic, minced
2 Tablespoons cilantro, finely minced
1 Tablespoon adobo from chipotle chilies
1/2 teaspoon salt
zest of 1 lime


Sweet and Spicy Wet Rub
1/2 teaspoon garlic powder
1/2 teaspoon onion powder

1/4 teaspoon ground coriander
1/2 teaspoon coarsely ground salt
1/2 teaspoon freshly ground black pepper
1-2 teaspoons brown sugar
Enough freshly squeezed lime juice to make a paste (save your limes!)

Stuffing
Handful of fresh cilantro, no need to chop
3-4 Garlic cloves, no need to peel
Spent limes

Preheat oven to 350F.  Prepare your roaster in your favourite method, by greasing with butter or spray oil, or lining with foil.  Carefully slide your hand between the skin and the breast of the chicken, moving your hand around, to loosen the skin. 
Combine butter, minced garlic cloves, cilantro, adobo, salt, and lime zest and rub it under the skin of the chicken. In a small bowl, combine the garlic powder, onion powder, coriander, brown sugar, salt & pepper, and enough fresh lime juice to create a paste for the chicken rub.  Massage the rub all over the chicken.  Stuff the inside of chicken with whole cloves of garlic, spent limes, and a handful of cilantro. 
Bake, covered, in preheated oven for approximately 1.5 - 2 hours or until the juice runs clear when breast is pierced.  Return to the oven with lid off for an additional 15-20 minutes, for the bird to brown, and the skin to get crispy.  Allow to bird to rest for about 5 minutes, before carving and serving.   
The pan drippings make a delicious gravy!  To make the gravy, use roaster (free of tinfoil), or pour drippings to pot.  Make a thickener using about ½ cup water, and Tablespoon or two of all purpose flour.  Turn heat to medium high, and add flour paste to grease, whisking until thickened.  
The chicken goes great with rice, beans and corn.  
Keep the bones!!  Remove as much leftover meat as possible, and keep in fridge.  Place the whole carcass in a large soup pot, and fill the pot with water, so the bones are completely covered.  Turn heat to lowest possible setting, and leave overnight to simmer.

Enjoy!


Sunday, March 2, 2014

Sunday Funday = Rainbow Loom Bracelets!

Remember friendship bracelets?   When I was a wee tween that was what was cool, hip, and crafty.  We would use embroidery thread, creating a series of knots into different patterns, and subsequent levels of difficulty.  
The current craze are these rainbow loom bracelets.  Rainbow loom mania has taken over our house!


They are everywhere!  Not meaning just that every kid I know is totally into this trend.   But that those little plastic bands, are literally everywhere.  I should take a picture of the amount of bands that I swept up the other day, I can't imagine how horrible they are in a vacuum!   


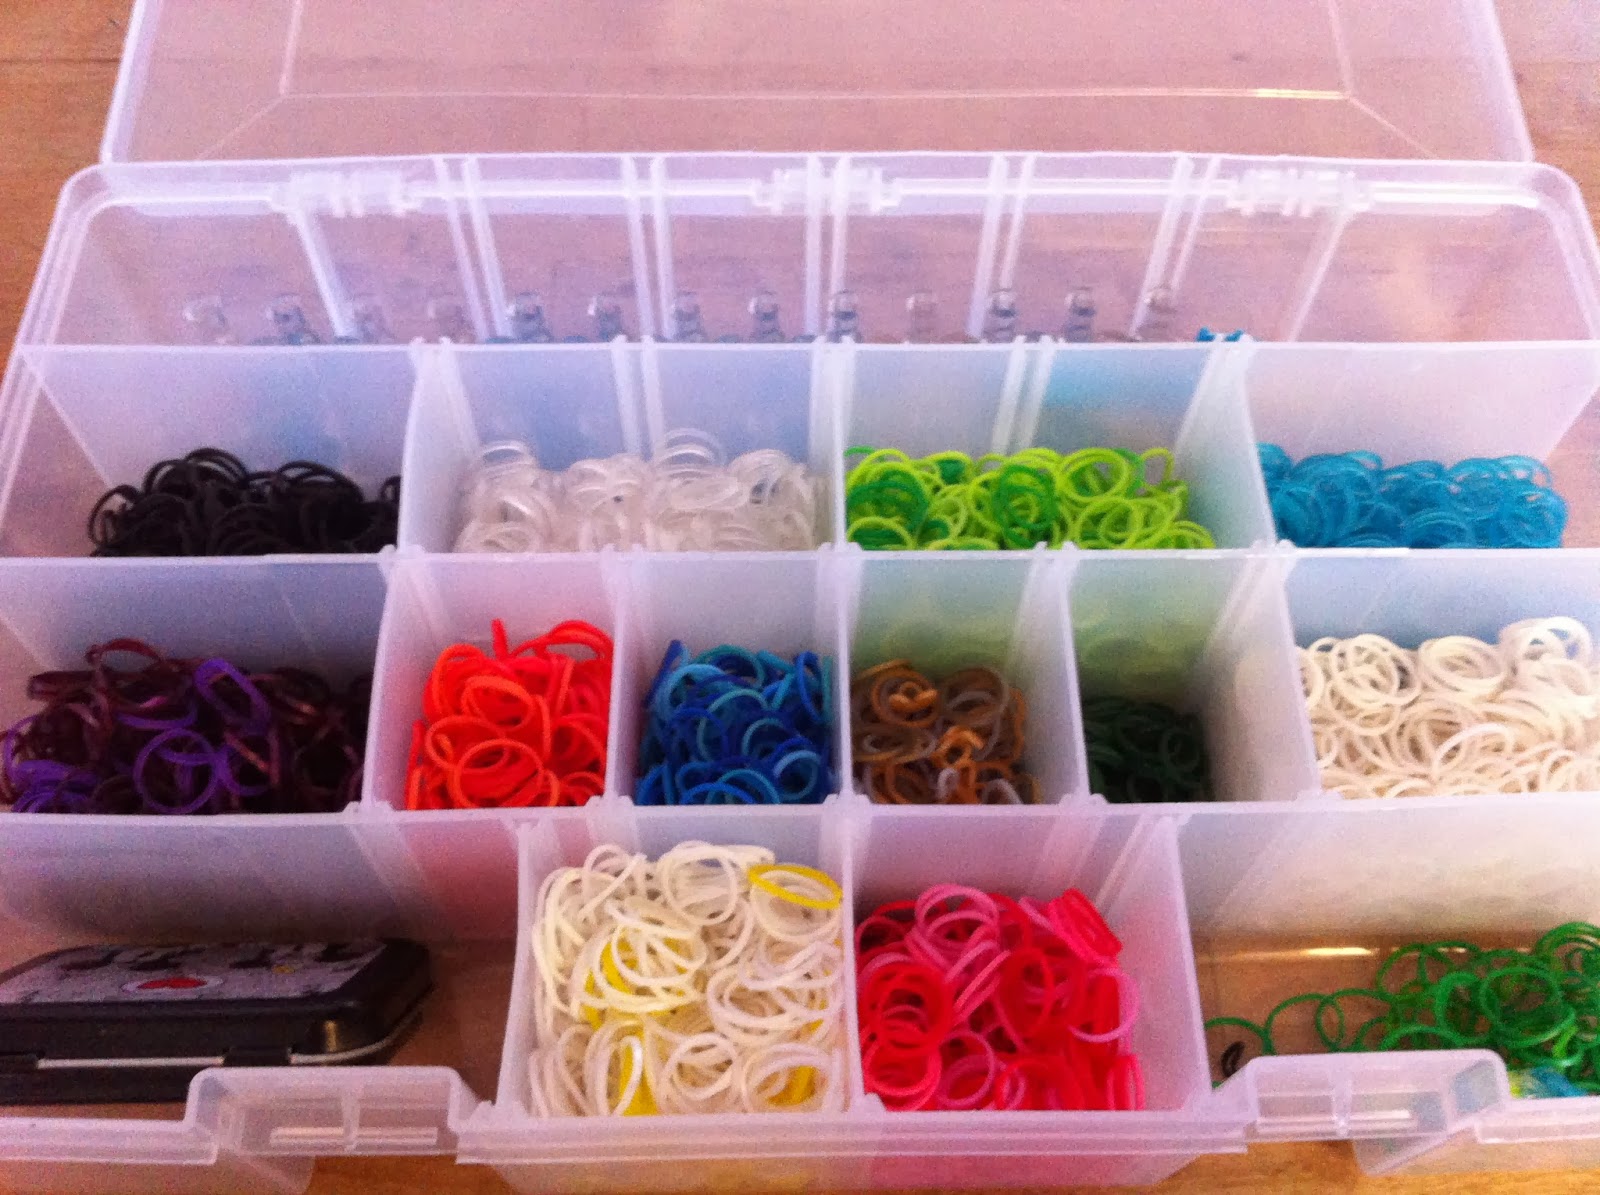
My daughter Sloane is so totally immersed in this rainbow loom mania.  She would do it 24/7 if not for school, homework, and gymnastics.  Look at her little organized system - so cute!  They sell organizers specifically meant for loom bands for a ridiculous price at the craft stores.  I recommend picking up a tackle box at Canadian Tire, Bass Pro Shops, Walmart or somewhere, for a fraction of the price.


Sloane even made her own little DIY video for YouTube, on how to create a "fishtail" rainbow loom bracelet.  Check it out!